My Collection allows you to add coins you own in an organized catalog for personal use or to compete in the Registry. CAC Registry allows you to add CAC, PCGS, and NGC graded coins to your collection.

“My Collection” Settings #
The new “Settings” button displayed at the top of your Collection page gives you new ways to make CAC’s Registry suit your specific needs. Included in the new settings options, you can now customize the columns shown in the My Collection table and show/hide your collection’s estimated value.

Show/Hide Estimated Collection Value #
To show/hide the estimated collection value shown at the top of the “My Collection” page, simply toggle the button “off” or “on” under the “General” settings.
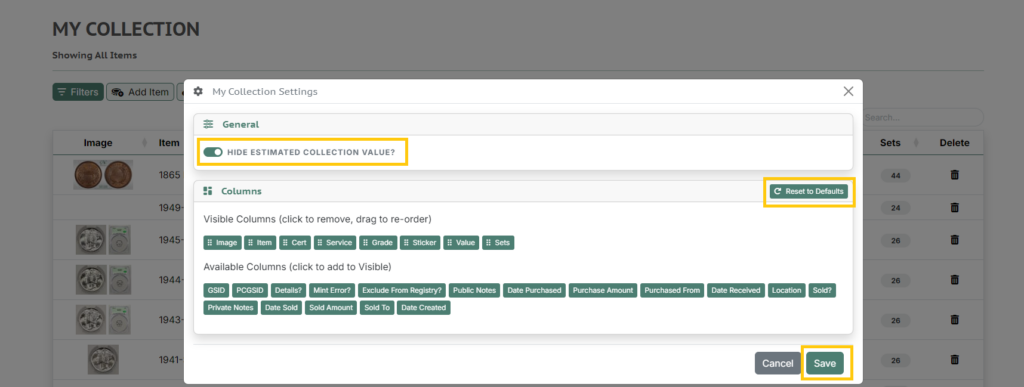
Customize Columns #
To customize the columns shown on the “My Collection” page, you’ll be working from the “Columns” settings section of the modal. To add or remove columns, click on the column description pill. Clicking items in the “Visible Columns” list will remove them from the table while clicking pills from the “Available Columns” list will add them to the table. There must be at least two “Visible Columns”.
Once you have the columns you wish to see selected (that is, they are in the “Visible Columns” list, you can now reorder them. To rearrange the columns to your preferred order, click and drag the pills in the “Visible Columns” to your desired order.
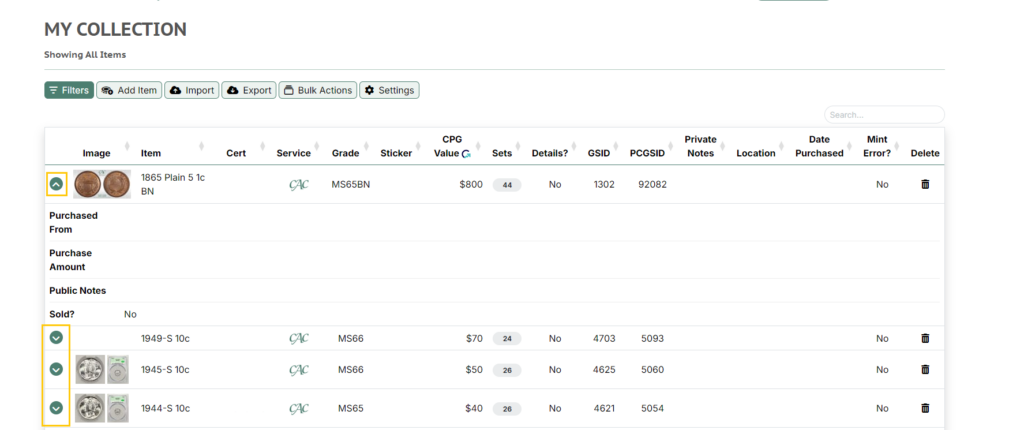
Depending on the number of columns now “visible” and the size of the screen you are using, not all selected columns may fit in the viewing window. But don’t worry, they are still accessible from the green arrow/dropdown at the beginning of each row (as pictured below). To view the columns that can’t be displayed all at once, simply select the green arrow, and the additional information will be shown. You can also collapse expanded rows by selecting the green arrow again.
Navigate to “My Collection” #
There are multiple ways to view your collection. From the website home, you can click my account and then select “My Collection” from the drop-down menu. You can also navigate to “My Collection” from the CAC Registry Home page by scrolling down and clicking on the first button with the number of coins and “My Collection” labeled below.


Once at My Collection, you’ll see that the default view for the page shows all items until filters are applied. You can click on the up and down arrows next to the column labels (Cert, Service, Grade, etc.) to sort your collection. The default setting will show 50 items per page, and that can be adjusted by clicking the box with a numerical drop-down menu.
How to Add Coins to “My Collection” #
Select “Add Item” next to the “Filters” button below “My Collection” heading.

Add to “My Collection” Using a Photo #
Once you’ve selected “Add Item,” you have several ways to make the addition of a coin to your collection seamless and easy. The easiest way to add an item in a holder to your collection would be to take or upload a photo of the barcode on the slab. This can be done by clicking on the button “Take a photo” and selecting “Use Photo” after taking or uploading the image of the barcode.

The barcode will fill out several of the missing fields including the grading service, cert #, grade, and catalog item information. If it’s a CAC coin, you will have the option to download the coin’s unique images from the CAC site and choose which you would like to have displayed.

You will have the ability to change the order in which the images are displayed. Please note that the first image in the “Images” box will be the one shown on the Registry. Use the arrow cross to click and drag the images in the order you would like them displayed. The trash can icon allows you to delete an image from the collection item. The downwards arrow icon gives you the option to download the image file to your device, and the magnifying glass opens the image in a new window for a detailed preview.

NEW – Dual images are available! In the case of having multiple photos of the same or similar dimensions, the CAC Registry will now showcase the photos side by side. The order in which the images are listed in the “Images” box will determine the photos selected for dual imaging. Obverse and reverse images should be back to back in the images box, not separated by another image.
Dual imaging will show in both “My Collection,” “My Registry Sets,” and in other places on the Registry.
Add to “My Collection” by Entering a Cert Number #
Another easy way to add an item to your collection is to select the grading service of the slabbed coin and enter the cert number found on the label. The system will then pull the rest of the coin’s information from the cert number provided on the label. Always make sure to doublecheck that the auto-filled fields, such as grade and item, are filled in correctly by the system. Please remember to toggle the “Details Coin” and “Mint Error” buttons if the certificate number does not successfully pull this information. Note that the default option under “Additional Details” is to exclude the item from the registry. Toggle this setting to your preference.

If the coin is not a CAC coin, you will need to take or upload your own images of the coin by selecting “Browse” in the bottom left corner. Always make sure to select “Save Item” in the bottom right corner to successfully save and add an item to your collection. Once you finish adding an item and hit save, our system will prompt you to add another item to your collection. If you’re all done, you may select the “Cancel” button next to “save item” in the bottom right.

There is a third way to add items to the “My Collection” page. Please visit the “How to Import & Export ‘My Collection’ document for assistance with this feature.